![]()
[Jul 08, 2025] D-PVM-OE-01 Exam Dumps - 100% Marks In D-PVM-OE-01 Exam!
Exam Dumps Use Real Storage Administrator Dumps With 156 Questions!
EMC D-PVM-OE-01 Exam Syllabus Topics:
| Topic | Details |
|---|---|
| Topic 1 |
|
| Topic 2 |
|
| Topic 3 |
|
| Topic 4 |
|
| Topic 5 |
|
| Topic 6 |
|
NEW QUESTION # 74
A PowerMax array has been added to the environment. As part of the configuration, a weekly backup is done every Sunday during the 8:00 AM hour. The load for all components during the backup window should not be in system-level compliance calculations.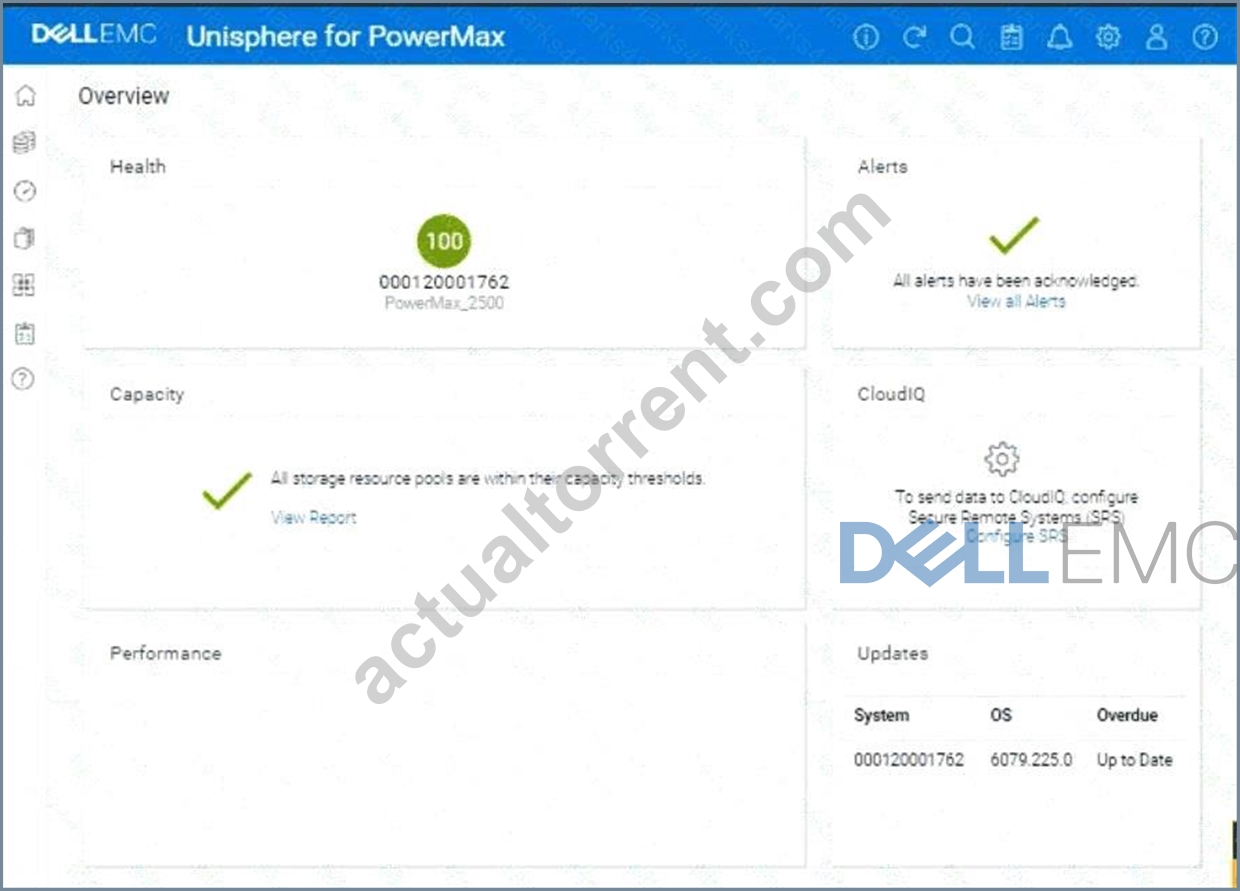
Using the simulator, set a recurring exclusion window at the system level on the array for the backup window.
Answer:
Explanation:
See the explanation for step by step solution.
Explanation:
Okay, I understand. We need to configure a recurring exclusion window in the Unisphere for PowerMax simulator to exclude performance load during a weekly backup that occurs every Sunday from 8:00 AM to 9:
00 AM. This exclusion will prevent the backup load from affecting system-level compliance calculations.
Here's a step-by-step guide on how to do this, based on typical Unisphere functionality:
Steps:
1. Launch the Simulator and Navigate to the System Settings
* Open Unisphere for PowerMax in your web browser.
* Log in to the simulator (you should already be logged in with the array SID 1762 selected, based on the image).
* In the left-hand navigation pane, locate the settings or configuration section. The exact location might vary slightly, but it's often found under:
* Home>System Settings
* Settings(an icon representing settings, like a gear)
* Admin>System
* In this instance, click thegearicon on the top right corner of the Unisphere interface.
2. Find the Exclusion Window Settings
* Within the system settings, look for a section related to performance monitoring, metrics, or thresholds.
* Within this section, search for an option to configure "Exclusion Windows," "Scheduled Exclusions," or something similar. The exact name may vary.
3. Create a New Exclusion Window
* Click on a button or link to create a new exclusion window. This might be labeled:
* "Create"
* "Add"
* "+"(a plus icon)
* A new window or panel will appear, allowing you to configure the exclusion window settings.
4. Configure the Exclusion Window Settings
* Name (Optional):You can give the exclusion window a descriptive name, such as "Weekly Backup Exclusion."
* Type:Select"Recurring"or"Repeating"as the exclusion window type.
* Schedule:
* Day of the Week:Select"Sunday".
* Start Time:Set the start time to 08:00 (or 8:00 AM). Make sure the time is in 24-hour format or that you correctly select AM if using 12-hour format.
* End Time:Set the end time to 09:00 (or 9:00 AM).
* Scope/Target:Since we want this exclusion to apply at the system level, make sure the scope is set to
"System"or the entire array (SID 1762 in this case). You might not need to explicitly select this if system-level is the default.
* Components/Metrics:In some Unisphere versions, you can choose which components or metrics to exclude. In our case, we want to exclude the load for "all components." If there's an option to select components, either choose "All" or leave it at the default (which likely includes all components).
5. Save the Exclusion Window
* After configuring all the settings, review them carefully to make sure they are correct.
* Click the button to save the exclusion window. This might be labeled:
* "Create"
* "Save"
* "OK"
* "Apply"
6. Verify Exclusion Window Creation (Optional)
* After the exclusion window is created, you can usually verify its settings in the exclusion window list.
* You should see the new exclusion window listed with the correct schedule (Sunday, 8:00 AM - 9:00 AM) and scope (system level).
Topic2, Multiple Choice Questions
NEW QUESTION # 75
A VMAX3 array has been configured with two Storage Resource Pools (SRP) Source volumes are assigned to SRP_1 and target volumes are assigned to SRP_2. A TimeFinder SnapVX snapshot of the source volumes is linked to the target volumes in the default mode What will happen when there are new host writes to the source volumes?
- A. Snapshot deltas will be stored in SRP__2
- B. Snapshot deltas will be stored in SRP_1
- C. Snapshot deltas will be stored in the Reserved Capacity of SRP_1
- D. Snapshot deltas will be stored in the Reserved Capacity of SRP_2
Answer: B
NEW QUESTION # 76
What takes place during an SRDF Restore operation?
- A. Enables access to both the R1 and R2 devices for their hosts
- B. Changes made to the R2 are propagated to the R1 Changes made to the R1 are discarded
- C. Changes made to the R1 are propagated to the R2. Changes made to the R2 are discarded
- D. Resumes normal SRDF mirroring and host access
Answer: C
Explanation:
Step by Step Comprehensive Detailed Explanation:
In SRDF (Symmetrix Remote Data Facility), a "Restore" operation is used to resynchronize the source (R1) and target (R2) devices after a situation where the target device might have been modifiedindependently. This typically occurs after a failover scenario where the target device becomes the primary and undergoes changes.
During an SRDF Restore operation:
* R2 Changes Discarded:Any changes made to the target (R2) device since the last synchronization are discarded.
* R1 Changes Propagated:The current data on the source (R1) device is copied over to the target (R2), overwriting any existing data on the target.
This effectively restores the target device to a state consistent with the source device, ensuring data integrity and consistency.
Why other options are incorrect:
* B. Resumes normal SRDF mirroring and host access:While a Restore operation can be part of the failback process, it's not the only step involved. Failback might involve additional actions like reversing replication direction and restoring host access.
* C. Changes made to the R2 are propagated to the R1. Changes made to the R1 are discarded:This describes an "Update" operation, not a "Restore."
* D. Enables access to both the R1 and R2 devices for their hosts:This describes a "Split" operation, where both devices are made accessible independently.
References and documents of Dell's public documentation for PowerMax Operate v.2:
* Dell Solutions Enabler 10.0.0 SRDF Family CLI User Guide:This guide provides detailed information about SRDF commands and operations, including the symrdf restore command. You can find this document on the Dell Support website by searching for "Solutions Enabler SRDF Family CLI User Guide."
* Dell PowerMax Family: Essentials and Best Practices Guide:This guide offers a comprehensive overview of SRDF and its functionalities, including disaster recovery scenarios and the use of the
"Restore" operation.
NEW QUESTION # 77
Which Unisphere for PowerMax client connection authentication type is irrevocable once it is selected?
- A. x.509 Common/Principal Name
- B. LDAP - SSL
- C. Windows AD Domain-based
- D. Multi-factor Authentication
Answer: A
NEW QUESTION # 78
Which VMAX All Flash software package includes Non-Disruptive Migration?
- A. AppSync Starter
- B. Pro
- C. Essentials
- D. FX
Answer: D
Explanation:
https://visiondatacenter.com/products/DELLEMC_VMAX450F/vmax-software-datasheet.pdf
NEW QUESTION # 79
Two PowerMax arrays have been configured for replication using SRDF During a disaster recovery operation production has been transferred to the R2 devices at the target site Which operation allows the primary hosts to access the R1 devices without waiting for a data transfer to complete from the R2 devices'?
- A. Fallback
- B. Resume
- C. Failover
- D. Update
Answer: B
Explanation:
Step by Step Comprehensive Detailed Explanation:
In an SRDF (Symmetrix Remote Data Facility) disaster recovery scenario where production has been switched to the R2 devices at the target site, theResumeoperation allows the primary hosts to regain access to the R1 devices without waiting for a full data transfer from the R2 devices.
Here's how it works:
* R1 Access:The Resume operation makes the R1 devices (at the primary site) accessible to the primary hosts.
* Background Synchronization:While the hosts access and modify data on the R1 devices, SRDF continues to synchronize the changes from the R2 devices (at the target site) in the background. This ensures that the R1 devices are gradually updated with any changes that occurred on the R2 devices during the failover.
This approach minimizes downtime and allows for a quicker return to the primary site without waiting for a lengthy synchronization process to complete before granting host access.
Why other options are incorrect:
* A. Update:This operation copies changes from R2 to R1, but it doesn't necessarily grant immediate host access to R1.
* B. Fallback:This is a more comprehensive process that involves reversing replication direction and fully restoring the primary site as the production environment.
* C. Failover:This operation switches production to the R2 devices, not the R1 devices.
References and documents of Dell's public documentation for PowerMax Operate v.2:
* Dell Solutions Enabler 10.0.0 SRDF Family CLI User Guide:This guide provides detailed information about SRDF commands and operations, including the symrdf resume command. You can find this document on the Dell Support website by searching for "Solutions Enabler SRDF Family CLI User Guide."
* Dell PowerMax Family: Essentials and Best Practices Guide:This guide offers a comprehensive overview of SRDF and its functionalities, including disaster recovery scenarios and the use of the
"Resume" operation.
NEW QUESTION # 80
When using TimeFinder SnapVX technology, what is the maximum number of target volumes that can be linked to a snapshot on a single source volume?
- A. 0
- B. 1
- C. 2
- D. 3
Answer: C
Explanation:
Step by Step Comprehensive Detailed Explanation:
TimeFinder SnapVX is a snapshot technology in PowerMax that allows you to create point-in-time copies of data. When using SnapVX, you can link target volumes to a snapshot to create writable copies of the data at that specific point in time.
The maximum number of target volumes that can be linked to a single snapshot on a source volume is255.
This limitation ensures efficient management and performance of the SnapVX snapshots and linked targets.
Why other options are incorrect:
* B. 256, C. 512, D. 1024:These numbers exceed the maximum limit of linked targets per snapshot.
References and documents of Dell's public documentation for PowerMax Operate v.2:
* Dell Solutions Enabler 10.0.0 TimeFinder SnapVX CLI User Guide:This guide provides detailed information about SnapVX features and limitations, including the maximum number of linked targets per snapshot. You can find this document on the Dell Support website by searching for "Solutions Enabler TimeFinder SnapVX CLI User Guide."
* Dell PowerMax Family: Essentials and Best Practices Guide:This guide offers a comprehensive overview of PowerMax technologies, including SnapVX. It may provide context for understanding the limitations and best practices for using SnapVX snapshots and linked targets.
NEW QUESTION # 81
On a PowerMax what is the correct sequence of steps to deduplicate data?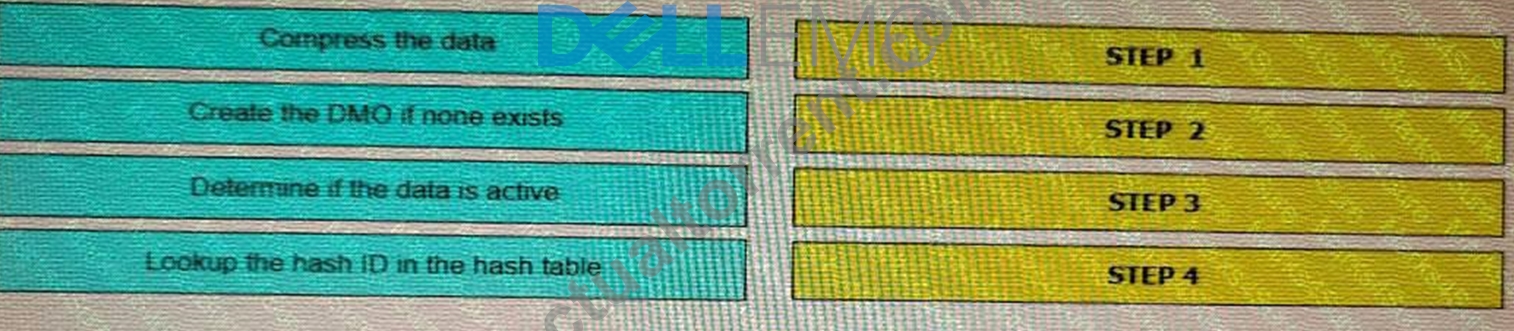
Answer:
Explanation: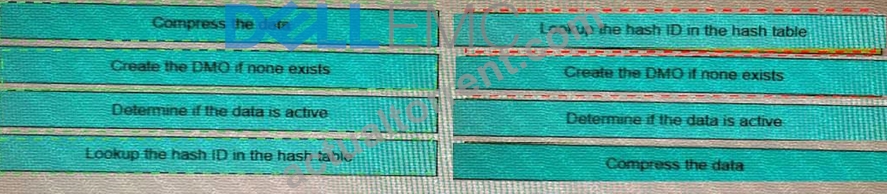
NEW QUESTION # 82
Where are the Host l/Os directed to when the Storage Group is in a Non-Disruptive Migration CutoverReady state?
- A. Source and target arrays
- B. Target array only
- C. Source array only
- D. Held in host cache
Answer: C
NEW QUESTION # 83
A systems administrator no longer needs the remote replica of a local device. Which step can be performed first in order to perform the deletepair function?
- A. Suspend the SRDF link
- B. Split the SRDF link
- C. Change the pair state to "NR"
- D. Change the type of the group to "regular
Answer: A
NEW QUESTION # 84
Place the steps in the correct order to create clone copy sessions of device groups.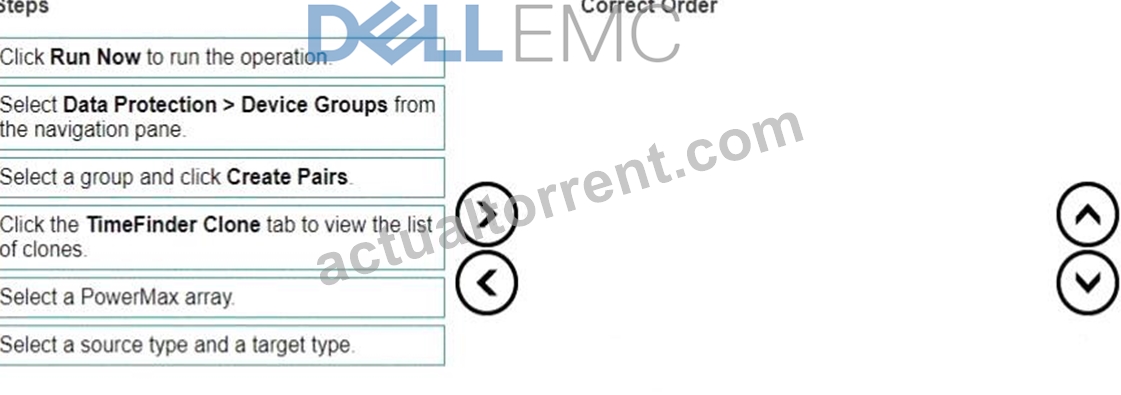
Answer:
Explanation: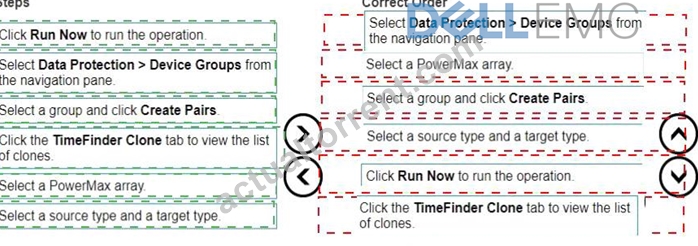
Explanation:
Here's the correct sequence of steps along with explanations:
Correct Order:
* Select Data Protection > Device Groups from the navigation pane.
* Why:This is the starting point within Unisphere for PowerMax. You need to navigate to the section where device groups are managed and where TimeFinder operations are initiated.
* Select a PowerMax array.
* Why:In an environment with multiple PowerMax arrays, you must specify the array on which you want to create the clone copy sessions.
* Select a group and click Create Pairs.
* Why:You are selecting the specific device group that will be the source for the clone operation and choosing the "Create Pairs" action to initiate the clone session creation process. This implies you are creating a clone from an existing group of devices.
* Select a source type and a target type.
* Why:This step defines the characteristics of the source and target devices for the clone session.
This could involve selecting from different storage groups, specifying thin or thick provisioning, or other relevant settings. Note that in a clone context, the "target type" often refers to how the clone will be linked to the source (e.g., a full copy or a linked target).
* Click Run Now to run the operation.
* Why:After configuring all the settings for the clone session, this action triggers the actual creation of the clone pairs based on the selected source and target types and other parameters.
* Click the TimeFinder Clone tab to view the list of clones.
* Why:Once the operation has been initiated, this is how you would verify that the clone sessions were created successfully and monitor their status.
* Select Data Protection > Device Groups from the navigation pane.
* Select a PowerMax array.
* Select a group and click Create Pairs.
* Select a source type and a target type.
* Click Run Now to run the operation.
* Click the TimeFinder Clone tab to view the list of clones.
NEW QUESTION # 85
A systems administrator has decommissioned a host with two devices allocated to it. What must the administrator do prior to deleting the devices?
- A. Remove the device attribute
- B. Unmap from the front-end ports
- C. Delete the Initiators
- D. Remove the Storage Group
Answer: D
NEW QUESTION # 86
When is the Unisphere Lockbox password required?
- A. Upgrading Unisphere for PowerMax
- B. Logging into Unisphere for PowerMax
- C. Creating performance charts
- D. Performing administration tasks
Answer: A
NEW QUESTION # 87
Place the steps in the correct order for performing a Non-Disruptive Migration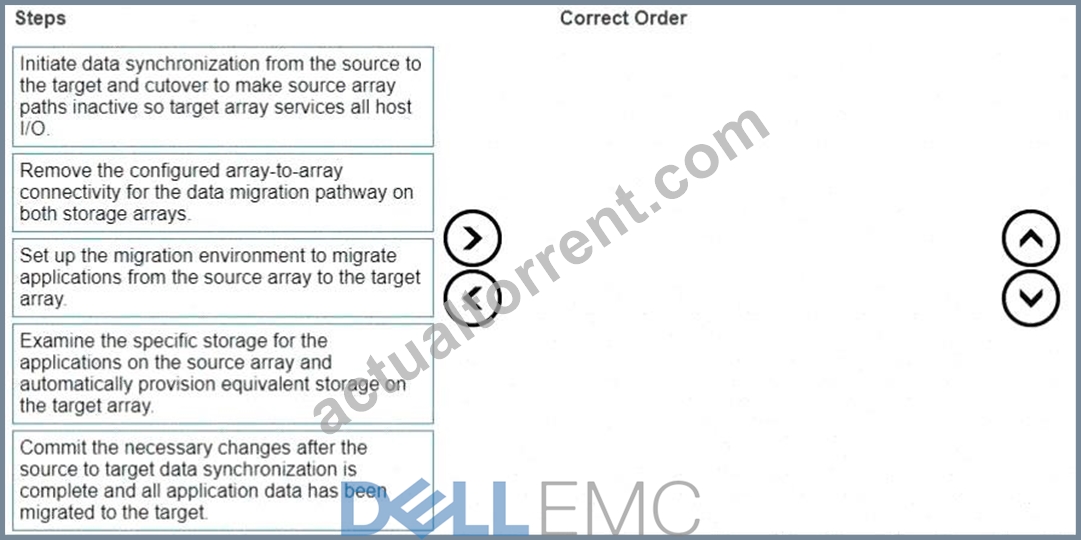
Answer:
Explanation: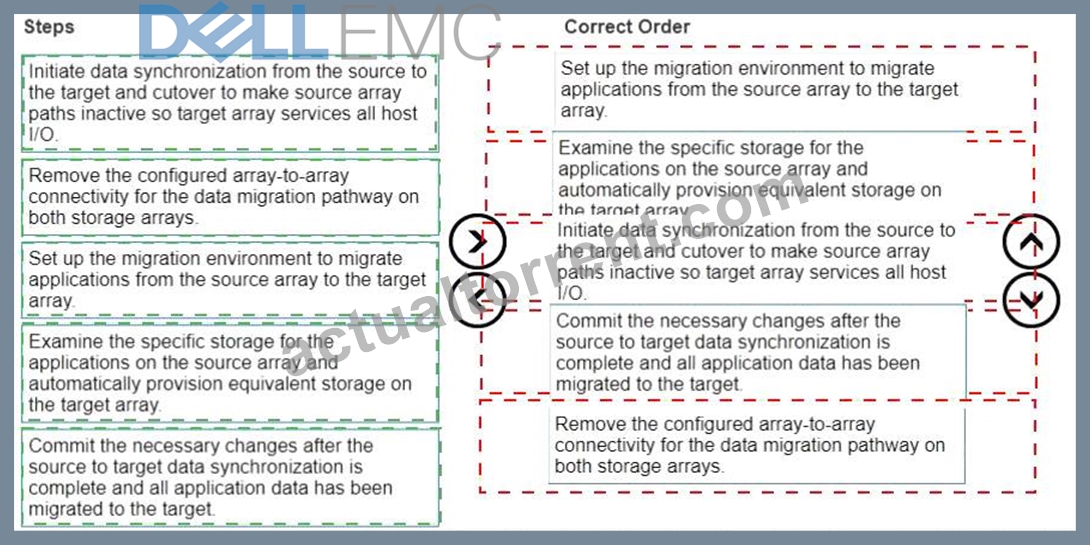
Explanation:
* Set up the migration environment to migrate applications from the source array to the target array.
* Examine the specific storage for the applications on the source array and automatically provision equivalent storage on the target array.
* Initiate data synchronization from the source to the target and cutover to make source array paths inactive so target array services all host I/O.
* Commit the necessary changes after the source to target data synchronization is complete and all application data has been migrated to the target.
* Remove the configured array-to-array connectivity for the data migration pathway on both storage arrays.
Correct Order:
* Set up the migration environment to migrate applications from the source array to the target array.
* Why:This is the initial setup phase, where you configure the necessary settings on both the source and target arrays to enable the migration. This involves actions like:
* Verifying compatibility between the source and target arrays.
* Ensuring that the required licenses are in place (e.g., NDM license).
* Configuring network connectivity (FC or iSCSI) for data transfer between the arrays.
* Examine the specific storage for the applications on the source array and automatically provision equivalent storage on the target array.
* Why:Before migrating data, you need to ensure that the target array has the appropriate storage capacity and configuration to host the applications.
* How:NDM can often automatically provision equivalent storage on the target based on the source configuration. This includes creating storage groups, volumes, and masking views that mirror the source.
* Initiate data synchronization from the source to the target and cutover to make source array paths inactive so target array services all host I/O.
* Why:This is the core of the migration process. Data is copied from the source to the target while the application continues to run. Cutover is the final step where I/O is redirected to the target array.
* How:
* Synchronization:Data is copied in the background.
* Cutover:Once synchronization is complete, a brief cutover is performed. In a well-planned NDM, this cutover is designed to be within the I/O timeout limits of most applications.
* Commit the necessary changes after the source to target data synchronization is complete and all application data has been migrated to the target.
* Why:This step finalizes the migration and makes it permanent.
* What it involves:The migration session is acknowledged and the configuration is finalized on the target array.
* Remove the configured array-to-array connectivity for the data migration pathway on both storage arrays.
* Why:After the migration is complete, the temporary connections used for data transfer between the arrays should be removed to free up resources and maintain a clean configuration.
* What it involves:This typically means removing the FC zones or iSCSI settings that were configured specifically for the NDM process.
NEW QUESTION # 88
A PowerMax array has been added to the environment. As part of the configuration, a weekly backup is done every Sunday during the 8:00 AM hour. The load for all components during the backup window should not be in system-level compliance calculations.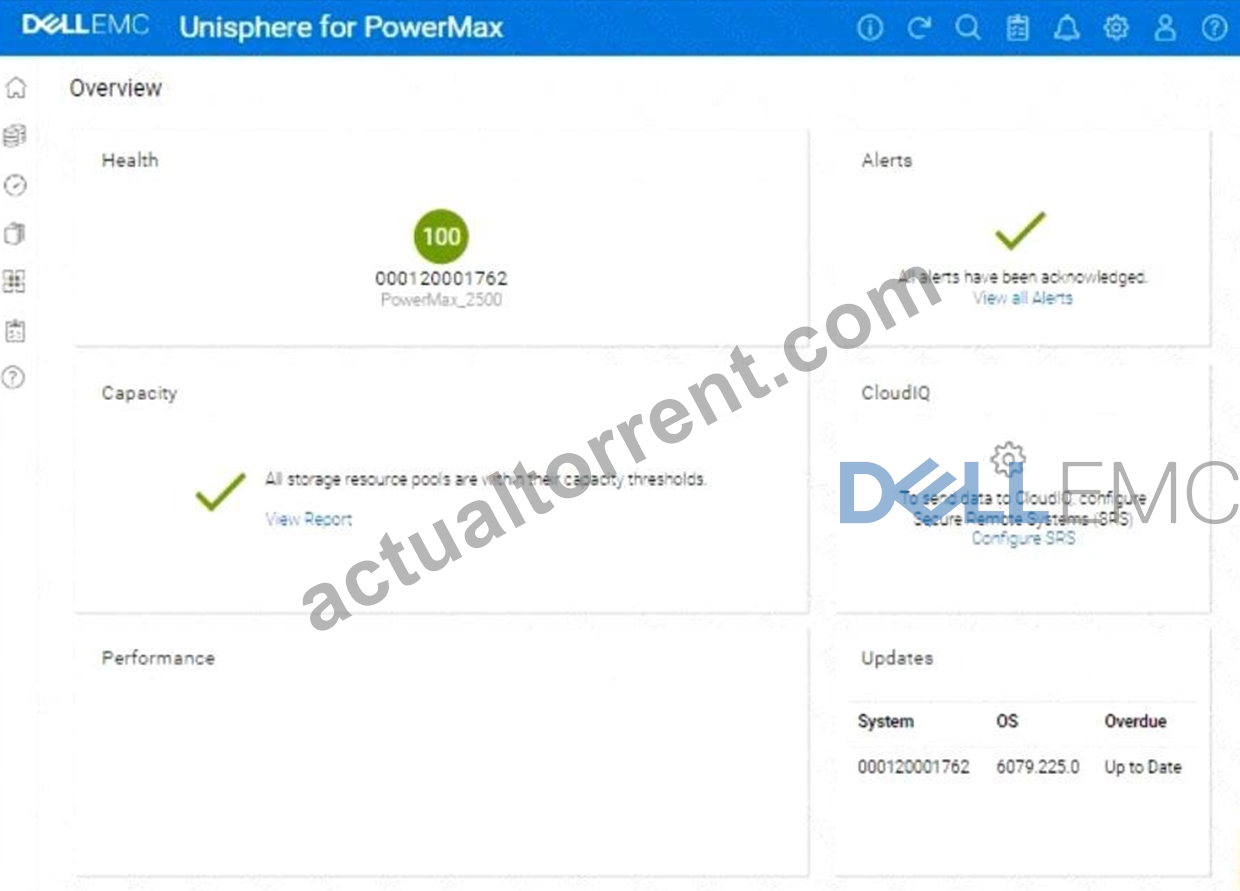
Using the simulator, set a recurring exclusion window at the system level on the array for the backup window.
Answer:
Explanation:
See the explanation for step by step solution.
Explanation:
Okay, I understand. We need to configure a recurring exclusion window in the Unisphere for PowerMax simulator to exclude performance load during a weekly backup that occurs every Sunday from 8:00 AM to 9:
00 AM. This exclusion will prevent the backup load from affecting system-level compliance calculations.
Here's a step-by-step guide on how to do this, based on typical Unisphere functionality:
Steps:
1. Launch the Simulator and Navigate to the System Settings
* Open Unisphere for PowerMax in your web browser.
* Log in to the simulator (you should already be logged in with the array SID 1762 selected, based on the image).
* In the left-hand navigation pane, locate the settings or configuration section. The exact location might vary slightly, but it's often found under:
* Home>System Settings
* Settings(an icon representing settings, like a gear)
* Admin>System
* In this instance, click thegearicon on the top right corner of the Unisphere interface.
2. Find the Exclusion Window Settings
* Within the system settings, look for a section related to performance monitoring, metrics, or thresholds.
* Within this section, search for an option to configure "Exclusion Windows," "Scheduled Exclusions," or something similar. The exact name may vary.
3. Create a New Exclusion Window
* Click on a button or link to create a new exclusion window. This might be labeled:
* "Create"
* "Add"
* "+"(a plus icon)
* A new window or panel will appear, allowing you to configure the exclusion window settings.
4. Configure the Exclusion Window Settings
* Name (Optional):You can give the exclusion window a descriptive name, such as "Weekly Backup Exclusion."
* Type:Select"Recurring"or"Repeating"as the exclusion window type.
* Schedule:
* Day of the Week:Select"Sunday".
* Start Time:Set the start time to 08:00 (or 8:00 AM). Make sure the time is in 24-hour format or that you correctly select AM if using 12-hour format.
* End Time:Set the end time to 09:00 (or 9:00 AM).
* Scope/Target:Since we want this exclusion to apply at the system level, make sure the scope is set to
"System"or the entire array (SID 1762 in this case). You might not need to explicitly select this if system-level is the default.
* Components/Metrics:In some Unisphere versions, you can choose which components or metrics to exclude. In our case, we want to exclude the load for "all components." If there's anoption to select components, either choose "All" or leave it at the default (which likely includes all components).
5. Save the Exclusion Window
* After configuring all the settings, review them carefully to make sure they are correct.
* Click the button to save the exclusion window. This might be labeled:
* "Create"
* "Save"
* "OK"
* "Apply"
6. Verify Exclusion Window Creation (Optional)
* After the exclusion window is created, you can usually verify its settings in the exclusion window list.
* You should see the new exclusion window listed with the correct schedule (Sunday, 8:00 AM - 9:00 AM) and scope (system level).
NEW QUESTION # 89
What are the Compliance levels for Storage Groups in Unisphere for PowerMax?
- A. Fatal, Critical, Warning, and No Status
- B. Critical, Marginal, Stable, and No Status
- C. Critical, Marginal, Warning, and No Status
- D. Fatal, Critical, Stable, and No Status
Answer: B
NEW QUESTION # 90
A customer has an existing host with two 100 GB volumes that are assigned from existing PowerMax storage.
They would like to add three additional volumes of 100 GB each and change the service level that is assigned to the storage group from Gold to Platinum to support the current application SLO requirements.
Answer:
Explanation:
See the explanation for step by step solution.
Explanation:
You want a detailed, step-by-step guide on how to add three 100 GB volumes to an existing host and change the service level of the associated storage group from Gold to Platinum on a PowerMax array, using the Unisphere for PowerMax interface shown in the image.
Here's a comprehensive guide, broken down into manageable steps:
Phase 1: Provisioning the New Volumes
Step 1: Log in to Unisphere for PowerMax
* Open your web browser and enter the URL for your Unisphere for PowerMax management interface.
* Log in with your administrator credentials.
Step 2: Navigate to Storage Groups
* In the left-hand navigation pane, click onStorageto expand the storage management section.
* Click onStorage Groupsunder the Storage section. This will display a list of existing storage groups on your PowerMax array.
Step 3: Locate the Target Storage Group
* Identify the storage group that currently contains the host's existing two 100 GB volumes.
* Tip:You can find this by:
* Looking at the "Hosts" tab within each storage group's details. It will list the hosts connected to that storage group.
* If you know the host's name, you might be able to search for it using the Unisphere search bar (if available).
Step 4: Initiate Adding Volumes
* Once you've found the correct storage group, select it by clicking on its name.
* Look for a button or option related to adding volumes. The exact wording might vary slightly depending on your Unisphere version, but it could be:
* "Add to Storage Group"
* "+"(a plus icon, which often signifies adding something)
* "Add Volumes"
* Click this button to start the process of adding new volumes to the storage group.
Step 5: Configure Volume Details
* A new window or panel will appear, allowing you to specify the characteristics of the new volumes.
* Select "Create new volumes"
* Number of Volumes:Enter 3 in the field for the number of volumes.
* Capacity:Enter 100 in the field for the capacity of each volume. Make sure the unit is set to GB.
* Volume Name (Optional):You can give the volumes a specific name or prefix, or you can let Unisphere auto-generate names.
* Service Level:Since the final goal is to move the entire Storage Group to platinum, you can either set this to platinum now or change it for the whole group later.
* Other Settings:Review any other available settings (e.g., thin provisioning, data reduction). In most cases, the default settings should be fine, but adjust them if needed based on your environment's best practices.
Step 6: Execute Volume Creation
* After you've configured all the volume settings, review them carefully to make sure they are correct.
* Click the button to execute the operation. This button might be labeled:
* "Run Now"
* "OK"
* "Finish"
* "Apply"
* Unisphere will start creating the new volumes. This might take a few moments.
Phase 2: Changing the Storage Group's Service Level
Step 7: Navigate Back to Storage Groups
* Once the volume creation is complete, go back to the list of storage groups. You can usually do this by clicking "Storage Groups" in the left-hand navigation pane again.
Step 8: Select the Target Storage Group
* Find the same storage group you worked with in Phase 1 (the one containing the host's volumes).
* Click on the storage group's name to open its properties.
Step 9: Modify the Service Level
* Look for a setting related to the "Service Level." It might be a dropdown menu, a field you can edit, or a link to a separate settings page.
* Change the Service Level fromGoldtoPlatinum.
Step 10: Save the Changes
* Click the button to save the changes to the storage group's service level. This button might be labeled:
* "Apply"
* "Save"
* "OK"
Phase 3: Host-Side Configuration
Step 11: Rescan for New Storage on the Host
* The host needs to be made aware of the newly provisioned storage. The exact process for this depends on the host's operating system:
* Windows:
* OpenDisk Management(diskmgmt.msc).
* Go toAction > Rescan Disks.
* Linux:
* Identify the SCSI host bus numbers (e.g., ls /sys/class/scsi_host).
* Use the command echo "- - -" > /sys/class/scsi_host/hostX/scan, replacing hostX with the appropriate host bus number.
* You might also be able to use tools like rescan-scsi-bus.sh.
* VMware ESXi:
* In the vSphere Client, select the host.
* Go toConfigure > Storage Adapters.
* Select the relevant storage adapter (e.g., your HBA).
* ClickRescan Storage.
Step 12: Initialize, Partition and Mount (if needed):
* Once the host detects the new volumes, you'll need to initialize them, create partitions, format them with a filesystem, and mount them, depending on your operating system and how you intend to use the storage. This is done using the host's operating system tools.
Phase 4: Verification and Monitoring
Step 13: Verify in Unisphere
* Go back to the storage group in Unisphere and check the "Volumes" tab. You should see the three new
100 GB volumes listed along with the original two, and they should all have the "Platinum" service level.
Step 14: Verify on the Host
* Confirm that the host can see and access the new volumes.
Step 15: Monitor Performance
* After making these changes, monitor the performance of the storage group and the application using Unisphere's performance monitoring tools. Ensure that the Platinum service level is meeting your application's requirements
NEW QUESTION # 91
What input is required when registering an ESXi server in Unisphere for PowerMax?
- A. IP address and hostname
C IP address and ESXi server credentials - B. Unisphere credentials and hostname
- C. ESXi server credentials and Unisphere credentials
Answer: C
Explanation:
Step by Step Comprehensive Detailed Explanation:
To register an ESXi server in Unisphere for PowerMax, you need to provide the following information:
* IP Address:The IP address of the ESXi server that you want to manage. This allows Unisphere to communicate with the ESXi host.
* ESXi Server Credentials:The username and password of an account with sufficient privileges to access and manage the ESXi server. This ensures that Unisphere has the necessary permissions to perform storage-related operations on the ESXi host.
Why other options are incorrect:
* A. Unisphere credentials and hostname:Unisphere credentials are used to log in to Unisphere itself, not to register an ESXi server.
* B. IP address and hostname:While the hostname might be helpful, the ESXi server credentials are essential for authentication and authorization.
* D. ESXi server credentials and Unisphere credentials:Unisphere credentials are not required for registering an ESXi server.
References and documents of Dell's public documentation for PowerMax Operate v.2:
* Dell PowerMax and VMware vSphere Configuration Guide:This guide provides detailed instructions on how to register and manage ESXi servers in Unisphere for PowerMax. You can find this document on the Dell Support website by searching for "PowerMax and VMware vSphere Configuration Guide."
* Dell Unisphere for PowerMax 10.0.0 Online Help:The online help for Unisphere might also provide guidance on registering ESXi servers.
NEW QUESTION # 92
What are the Compliance levels tor Storage Groups in Unisphere for PowerMax?
- A. Critical, Marginal. Stable, and No Status
- B. Fatal. Critical. Stable, and No Status
- C. Fatal Critical Warning, and No Status
- D. Critical, Marginal. Warning, and No Status
Answer: A
NEW QUESTION # 93
Production work has been started on the R2 devices after an 5RDF Failover operation. Where will the changes made to the R2 devices be reflected in the SRDF Query output shown in the exhibit?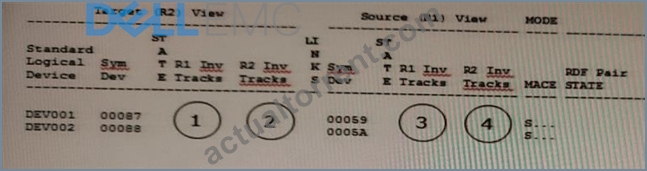
- A. 0
- B. 1
- C. 2
- D. 3
Answer: C
NEW QUESTION # 94
What are two characteristics of a SnapVX Linked Target?
- A. They are read writable (R/W).
- B. They cannot send data to SRDF
- C. They can be made secure
- D. They support a maximum of 1024 snaps per volume
Answer: A,B
Explanation:
Step by Step Comprehensive Detailed Explanation:
* SnapVX Linked Targets:SnapVX is a snapshot technology used in Dell PowerMax storage arrays. A linked target is a volume that provides read/write access to a specific point-in-time copy (snapshot) of a source volume.
* Read/Write Access:Unlike traditional snapshots, which are typically read-only, SnapVX linked targets allow modifications. This makes them suitable for use cases like testing, development, and data analysis where changes need to be made to a copy of the data without affecting the original source.
* Secure Snapshots:SnapVX offers the capability to create "secure snapshots." These snapshots are write-protected and prevent any modifications or deletion, ensuring data integrity and protection against accidental or malicious changes.
Why other options are incorrect:
* B. They support a maximum of 1024 snaps per volume:This is partially correct. While a source volume can have up to 1024 snapshots, this limit includes all types of snapshots (manual, automated, and legacy), not just linked targets.
* B. They cannot send data to SRDF:This is incorrect. SnapVX linked targets can participate in SRDF (Symmetrix Remote Data Facility) replication, allowing for disaster recovery and data mobility.
References and documents of Dell's public documentation for PowerMax Operate v.2:
* Dell Solutions Enabler 10.0.0 TimeFinder SnapVX CLI User Guide:This guide provides detailed information about SnapVX features and commands, including how to create, link, and manage snapshots. It confirms the read/write capability of linked targets and the ability to create secure snapshots. You can find this document on the Dell Support website by searching for "Solutions Enabler TimeFinder SnapVX CLI User Guide."
* Dell PowerMax Family: Essentials and Best Practices Guide:This guide offers a comprehensive overview of PowerMax technologies, including SnapVX. It highlights the benefits of SnapVX linked targets for various use cases. You can find this document on the Dell Support website by searching for
"PowerMax Family Essentials and Best Practices Guide."
NEW QUESTION # 95
Exhibit.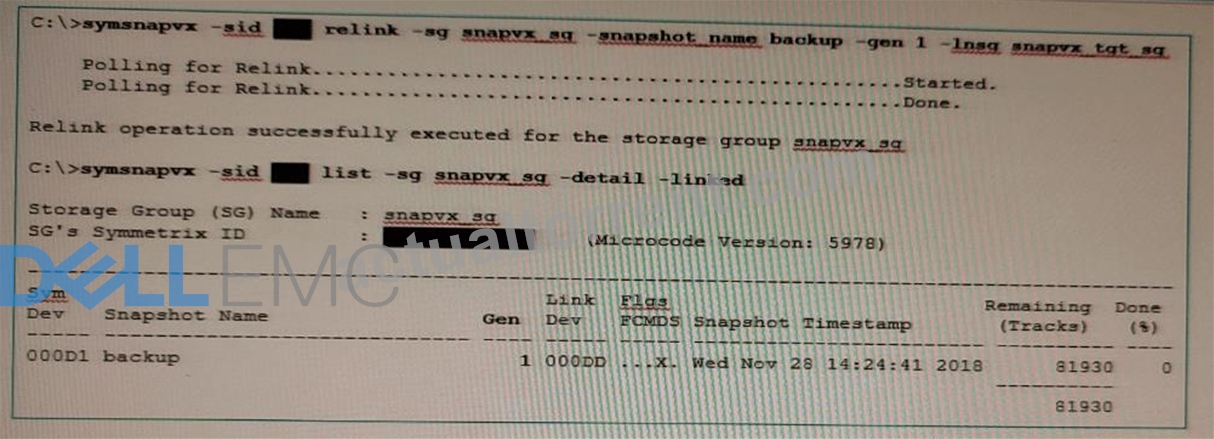
Which activity needs to be performed prior to the operations shown in the exhibit?
- A. Target volumes should be unmapped
- B. TTL setting should be changed
- C. Snapshot should be terminated
- D. Target volumes should be unmounted
Answer: B
NEW QUESTION # 96
Data is written on a source track and the original data needs to be preserved for a snapshot. Which technology does TimeFinder SnapVX use to prevent a new write from being demoted to a lower tier?
- A. Copy mode
- B. Redirect-on-write
- C. NoCopy mode
- D. Copy-on-write
Answer: D
NEW QUESTION # 97
......
Pass Your D-PVM-OE-01 Exam Easily With 100% Exam Passing Guarantee: https://pass4sure.actualtorrent.com/D-PVM-OE-01-exam-guide-torrent.html